
Wilderness regions are uncontrolled regions on the Map, and may be hills, mountains, lakes, etc. Conquering these regions will improve production of the relevant resource. How much your production is increased depends on the level of the region. The level of the region impacts how hard the region is to conquer and how many troops you will need. You can scout before you try to conquer the region to get an idea of what kind of troops you will need.
Charts
Units in Wilderness
This chart indicates how many troops you will encounter in an unoccupied wilderness:
| Level | Supply Troop |
Militiamen | Scout | Pikemen | Swordmen | Archer | Cavalry | Heavy Cavalry |
Ballista | Battering Ram |
Catapult | Traps |
|---|---|---|---|---|---|---|---|---|---|---|---|---|
| 1 | 50 | 50 | ||||||||||
| 2 | 100 | 100 | 50 | 50 | 5 | |||||||
| 3 | 200 | 200 | 100 | 100 | 50 | 10 | ||||||
| 4 | 500 | 500 | 200 | 200 | 100 | 50 | 20 | |||||
| 5 | 1000 | 1000 | 500 | 500 | 200 | 100 | 50 | 50 | ||||
| 6 | 1500 | 1500 | 1000 | 1000 | 500 | 200 | 100 | 100 | ||||
| 7 | 3000 | 3000 | 1500 | 1500 | 1000 | 500 | 200 | 50 | 150 | |||
| 8 | 6000 | 6000 | 3000 | 3000 | 1500 | 1000 | 500 | 100 | 50 | 300 | ||
| 9 | 12000 | 12000 | 6000 | 6000 | 3000 | 1500 | 1000 | 200 | 100 | 50 | 600 | |
| 10 | 25000 | 25000 | 12000 | 12000 | 6000 | 3000 | 1500 | 400 | 200 | 100 | 50 | 1200 |
Traps regenerate 10% of that level every 5 minutes.
Defeated Wilderness Forces repopulate 10% of that level every 5 minutes.
Fighting in the Wilderness
Note that the effectiveness of your troops in battle is determined by the level of your knight and your levels in fletching, metal alloys, poisoned edge and healing potions.
With the addition of Traps in the patch of 25. February, it is no longer possible to conquer a Wilderness level 2 and above without any losses.
However, 1 Militiaman will clear all traps on any level wild. The report will read, "Troops were overwhelmed in battle. Unable to determine enemy strength.", and will only show 1 trap cleared, but rest assured that they are all gone.
Here is a basic chart that indicates the properties of different levels:
| Level |
Resource Bonus |
Wave 1 - clear traps |
Wave 2 - main attack |
Troop Losses |
Minimum Fletching |
Minimum Rally Point Level |
Comments |
|---|---|---|---|---|---|---|---|
| 1 | 5% | n/a | 2 Swordsmen |
0 |
n/a |
1+ |
OK @ lvl 8 tech |
| 1 | 5% | n/a | 20 Pikemen |
0 |
n/a |
1+ |
OK @ lvl 8 tech |
| 1 | 5% | n/a | 3 Cavalry |
0 |
n/a |
1+ |
OK @ lvl 8 tech |
| 1 | 5% | n/a | 1 Heavy Cavalry |
0 |
n/a |
1+ |
OK @ lvl 8 tech |
|
1 |
5% |
n/a |
4 Ballistae |
0 |
6+ |
1+ |
OK @ lvl 8 tech |
| 1 | 5% | n/a |
50 Archers |
0 |
1+ |
1+ |
OK |
| 2 | 10% | 1 Militiaman | 20 Ballistae |
1 Militiaman |
6+ |
2+ |
OK @ lvl 8 tech |
|
2 |
10% |
1 Militiaman |
250 Archers + 1 Militiaman |
1 Militiaman |
2+ |
2+ |
OK |
| 3 | 15% | 1 Militiaman | 50 Ballistae |
1 Militiaman |
6+ |
2+ |
OK @ lvl 8 tech |
|
3 |
15% |
1 Militiaman |
500 Archers + 1 Militiaman |
1 Militiaman |
3+ |
2+ |
OK |
| 4 | 20% | 1 Militiaman | 175 Ballistae | 1 Militiaman | 6+ | 2+ | OK @ lvl 8 tech |
|
4 |
20% |
1 Militiaman |
1,000 Archers + 1 Militiaman |
1 Militiaman |
4+ |
2+ |
OK |
|
5 |
25% |
1 Militiaman |
1,500 Archer + 1 Militiaman |
1 Militiaman |
5+ |
2+ |
OK |
|
6 |
30% | 1 Militiaman |
3,000 Archers + 1 Militiaman |
1 Militiaman |
6+ |
2+ |
OK |
|
7 |
35% |
1 Militiaman |
1900 Ballistae |
1 Militiaman |
6+ |
2+ |
OK @ lvl 8 tech |
|
7 |
35% |
1 Militiaman |
6,000 Archers + 1 Militiaman |
1 Militiaman |
8+ |
2+ |
OK |
|
8 |
40% |
1 Militiaman |
40k Archers + 800 Ballistae |
1 Militiaman & 1 Archer |
8+ |
5+ |
OK @ lvl 8 tech |
|
9 |
45% |
1 Militiaman | 80k Archers + 2500 Ballistae |
1 Militiaman & 1 Archer |
8+ |
9+ |
OK @ lvl 8 tech |
|
10 |
50% |
1 Militiaman |
90k Archers + ?? Catapults |
1 Militiaman & ?? |
10 |
10 |
Not OK |
- Courtesy of Lady Sarena of Council of Elders
- Updated by Furnix, Theo, and Dreldan
- Updated by Checelieto.
- Updated no. of archers on level 6, 7
- Updated by Persephassa
- Updated by Brooklyn
- Changed number of needed archers for level 5 wilderness. Need more than 1500 even at higher fletching and combat points to avoid losses other than initial militiaman.
- This chart is under much debate, see comments.
- Fighting in the Wilderness (additional)
- Please contribute to Wilderness Research.
- "OK @ lvl 8 tech" means it works for me, but if your research levels are lower you may need a few more troops. Please verify with lower tech levels for a general OK status. When verified, edit page, or leave comment below so OK status may be updated. Thank you.
Multi-wave Attacks
Your Rally Point must be at least Lvl. 2 to send two attacks from the same location. You must also have 2 knights available (not assigned a current role.)
You need to time the 2 waves so that the Archers arrive 1-15 seconds after the Militiamen. (Edit: If you want to play it safe, just send along a few more Militamen with the second wave, they will die off before the Archers.) You need Fletching researched to the level of the wilderness you are attacking.
To help with coordinating march times, go back into the march screen imediatly and send a couple militia with the archers. This slows the archers to the march speed of militia and leaves you no math to do.
The Troop Speed page has a link to a web-based calculator that includes all skill effects, or follow the link here: KoC Troop Speed Calculator.
Here is an Excel table that will help with march timing Marching Calculator (provided by Darkfeather1)
Don't allow the second wave to overtake the first - send at least one of the slowest type of the first wave along with the second.
When attacking with heavy artillary, such as Ballista, they are slow enough that you no longer need to send along one Militiaman with the second wave.
Crests in the Wilderness
Starting with Tournament of Crests, Crests started dropping in the game. Some of these are also needed to build your third City.
| Level | Sir Bor's Crest | Sir Ector's Crest | Sir Kay's Crest | Sir Bedivere's Crest | Sir Gawain's Crest | Sir Percival's Crest | Sir Galahad's Crest | Sir Lancelot's Crest | King Arthur's Crest |
|---|---|---|---|---|---|---|---|---|---|
| 5 | X | X | X | ||||||
| 6 | X | X | X | ||||||
| 7 | X | X | X | ||||||
| 8 | X | X | X | X | |||||
| 9 | X | X | X | X | |||||
| 10 | X | X | X | X | X |
Types of Wilderness
Mountains
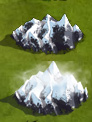 |
Mountains increase your ore production. |
Woods
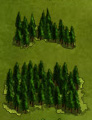 |
Woods increase your wood production. |
Hills
 |
Hills increase your stone production. |
Grasslands
 |
Grasslands increase your food production. |
Lakes
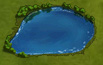 |
Lakes increase your food production. |
Plains
 |
Plains are where you build new cities. |
Bogs
 |
Bogs are impenetrable, and cannot be conquered. |