| Line 925: | Line 925: | ||
Mercenaries are soldiers who will defend your lands for you while your troops are away. They do not consume food but they need to get paid with [[Gold]] . You can hire three different types of mercenaries: Novices (200 gold/hour), Intermediates (400 gold/hour) or Veterans (1000 gold/hour). |
Mercenaries are soldiers who will defend your lands for you while your troops are away. They do not consume food but they need to get paid with [[Gold]] . You can hire three different types of mercenaries: Novices (200 gold/hour), Intermediates (400 gold/hour) or Veterans (1000 gold/hour). |
||
| + | |||
| − | Novice: Militiaman 260 Scout 100 Pikeman 410 Swordsman 330 |
||
| + | |||
| − | Intermediate: Scout 100 Swordsman 340 Archer 340 Cavalry 320 |
||
| + | |||
| − | Veteran: Scout 100 Cavalry 400 Heavy Cavalry 200 Ballista 400 |
||
=== Novice Mercenaries === |
=== Novice Mercenaries === |
||
Revision as of 11:01, 27 August 2010

Wilderness regions are uncontrolled regions on the Map, and may be hills, mountains, lakes, etc. Conquering these regions will improve production of the relevant resource. How much your production is increased depends on the level of the region(level 1 will give you 5% and level 10 will give you 50% more resources, each level gives you 5 more% -- level x 5...e.g. lvl3 wild x 5 is 15% ). The level of the region impacts how hard the region is to conquer and how many troops you will need. You can scout before you try to conquer the region to get an idea of what kind of troops you will need. In Wilderness regions level 5 up to 10 you may find crests but it is very random.
Charts
Units in Wilderness This chart indicates how many troops you will encounter in an unoccupied wilderness:
| Level | Supply Troop |
Militiamen | Scout | Pikemen | Swordmen | Archer | Cavalry | Heavy Cavalry |
Ballista | Battering Ram |
Catapult | Traps |
|---|---|---|---|---|---|---|---|---|---|---|---|---|
| 1 | 50 | 50 | ||||||||||
| 2 | 100 | 100 | 50 | 50 | 5 | |||||||
| 3 | 200 | 200 | 100 | 100 | 50 | 10 | ||||||
| 4 | 500 | 500 | 200 | 200 | 100 | 50 | 20 | |||||
| 5 | 1000 | 1000 | 500 | 500 | 200 | 100 | 50 | 50 | ||||
| 6 | 1500 | 1500 | 1000 | 1000 | 500 | 200 | 100 | 100 | ||||
| 7 | 3000 | 3000 | 1500 | 1500 | 1000 | 500 | 200 | 50 | 150 | |||
| 8 | 6000 | 6000 | 3000 | 3000 | 1500 | 1000 | 500 | 100 | 50 | 300 | ||
| 9 | 12000 | 12000 | 6000 | 6000 | 3000 | 1500 | 1000 | 200 | 100 | 50 | 600 | |
| 10 | 25000 | 25000 | 12000 | 12000 | 6000 | 3000 | 1500 | 400 | 200 | 100 | 50 | 1200 |
Traps regenerate 10% of that level every 5 minutes.
Defeated Wilderness Forces repopulate 10% of that level every 5 minutes.
Fighting in the Wilderness
Note that the effectiveness of your troops in battle is determined by the level of your knight and your levels in fletching, metal alloys, poisoned edge and healing potions.
With the addition of Traps in the patch of 25. February, it is no longer possible to conquer a Wilderness level 2 and above without any losses..
Updated Tutorial - May 23, 2010
Send as many milita or supply troops as there are traps in the first wave, and they will all be sacrificed to the traps.
Note: Supply troops are slower than militia however, ballistaes are even slower than both, so, for lv 8+ wilds, it can be more economical to use supply troops as sacrifices.
Here is a basic chart that indicates the properties of different levels:
Make your 2nd wave marches immediately after the 1st suicide run wave within 14 seconds.
    Wave 2 Main attack must be done as quickly as possible, traps will re-spawn and kill your fighting troops in Wave 2 in 15-30 seconds.
    By the time you're hitting a Level 5 Wilderness hopefully you've researched Featherweight Powder at least to Level 2 so
    that each Supply Troop can carry 240 Resource units.  At Level 5, the respawning rate of the traps are
    instant.  In 15 seconds the 50 traps will kill 50 Archers of your second wave. On level 8 to 10 wilderness add 1 ballista to militia wave       to make timer similar.
The point of this chart is to give you the lowest loss scenario. Losing 20k militia for 1 wild is NOT efficient when you can do it by losing per say 50 catas. Stop messing with the low level wilds and adding 20 different wave setups for 9-10. Go to Wilderness Research to put up your research data. This table below is ONLY for the lowest cost loss or the easiest.
this s the minimum lost of lvl 10 with lvl 9 researches... i tried 80,000 Archers and 10,000 Ballistas it has the same amount of looses
Contributors- Lord MightyMarv
- Lady Sarena of Council of Elders
- Furnix, Theo, and Dreldan=
- Persephassa
- Brooklyn
- Casper_DM
- Checelieto = zeusmaxfield
- NoodleOh
- Desero
- Eshara24
- Altiar
- MiLkDudD12
- Lord AP0LL0
- Chrishaas
- Azurwraith (added level 8 no loss scenario)
- Updated Rows and Table style Desero 21:42, May 27, 2010 (UTC)
- Updated Table style mk7ita
- LordAesir (Removed n00b edit per comments below)
- Belzebeb (edited lvl 9 losses for 40k archer/1000 ballista)
- Elvis Junior (added lvl 10 ballista and ballista/archer data)
- SirLancelot (edited level 8 archer/ballista/sword and level 9 44k archer data)
- Pulverizer
- Fighting in the Wilderness (additional)
- Please contribute to Wilderness Research (For lv 8-10 Research).
Multi-wave Attacks
Your Rally Point must be at least Lvl. 2 to send two attacks from the same location. You must also have 2 knights available (not assigned a current role.)
You need to time the 2 waves so that the Archers(you can send balista if you don't have archer it work as good as if they where archer) arrive 1-15 seconds after the Militiamen. You need Fletching researched to the level of the wilderness you are attacking.
To help with coordinating march times, go back into the march screen immediatly and send the required supply troops with the archers. This slows the archers to the marching speed of the 1st wave of supply troops and avoids an overtaking situation. Don't allow the second wave to overtake the first - send at least one of the slowest type of the first wave along with the second.
Better still, use two tabs in your browser both loaded with the map and create each wave in a separate tab, that way you can launch waves in a few seconds of each other.
The Troop Speed page has a link to a web-based calculator that includes all skill effects, or follow the link here: KoC Troop Speed Calculator.
Here is an Excel table that will help with march timing Marching Calculator (provided by Darkfeather1)
Crests in the Wilderness
Starting with Tournament of Crests, Crests started dropping in the game. Some of these are also needed to build both your third City and fourth City.
For more information, see crest.
Newer Released crests : Galahad, Percival And Lancelots crests are meant to be available in wilds now.. They can be found in Lvl 8+ wilds.
|
Wilderness
|
Resource Bonus |
Wave 1 - Suicide Run to use up traps |
Wave 2 - Main Attack |
Troop Losses |
Minimum Fletching |
Rally Point Level |
Comments |
|---|---|---|---|---|---|---|---|
| 1 | 5% | n/a | 300 Archers | None | 6+ |
1+ |
OK |
| 1 | 5% | n/a |
50 Swordsmen |
None |
. |
1+ |
Does not secure,
|
| 2 |
10% |
5 militia/supply tr. |
150 Archers & 1 Supply* |
5 Supply |
2+ |
2+ |
OK |
| 3 |
15% |
10 militia/supply tr. |
300 Archers |
1st Wave |
3+ |
2+ |
OK |
| 4 |
20% |
20 militia/supply tr. |
1,000 Archers |
1st Wave |
4+ |
2+ |
OK |
| 5 |
25% |
50 militia/supply tr. |
2,500 Archers |
1st Wave |
6+ |
2+ |
OK |
| 6 | 30% | 100 militia/supply tr. |
4,200 Archers |
1st Wave |
7+ |
2+ |
OK |
| 7 | 35% |
150 militia/supply tr. |
6,000 Archers |
1st Wave |
8+ |
2+ |
OK |
| 7 | 35% |
150 militia/supply tr. |
5,000 Archers |
1st Wave |
9+ |
2+ |
OK |
| 8 | 40% |
299 Militia/Supply Tr. + 1 Ballista** |
10k Archers + 10 Swordsman |
|
9+ |
|
|
| 8 | 40% |
299 Militia/Supply Tr. + 1 Ballista** |
10k Archers + 800 Ballista |
299 Militia, 1 Archer & 1 Ballista |
9+ | 2+ | OK |
| 8 | 40% |
299 Militia/Supply Tr. + 1 Balista** |
10k Archers + 1600 Balista |
1st Wave | 9+ | 2+ | OK |
| 8 | 40% |
299 Militia/Supply Tr. + 1 Balista** |
12k Archers
|
1st Wave 1 Archer | 9 | 9 | OK |
| 9 | 45% |
599 Militia/Supply Tr. + 1 Ballista** |
12k Swords + 30k Archers + 1200 Ballista |
1st Wave + 1 swordman & 100 Ballista | 9 | 5+ | OK |
| 9 | 45% |
599 Militia/Supply Tr. + 1 Ballista** |
44k Arches + 3000 Ballista |
1st Wave + 1 Archer | 10 | 9 | OK |
| 9 | 45% |
599 Militia/Supply Tr. +1 Ballista** |
40k Archers 1000 Ballista |
1st Wave + 3 Archers & 100 Ballista | 9 | 5+ | OK |
| 9 | 45% | 600 Militia |
43,425 Archers |
1st Wave + 1,063 Archers | 9 | 5+ | OK |
| 9 | 45% | 599 Militia + 1 Ballista | 40k Archers+ 10k Swords + 2500 Ballista | 1st Wave | 10 | 2+ | OK |
| 9 | 45% | 599 Militia + 1 Ballista | 75k archers +1000 balli |
1st Wave + 83 archers + 100 ballista | 9 | 7+ | OK |
| 10 | 50% | 1199 + 1 Ballista |
54,000 Archers + 2400 Ballista |
1st wave + 1006 Archers + 450 Ballista |
9 | 9 | OK |
| 10 |
50% |
1199 Militia + 1 Catapult |
30k Archers + 2500 Catapults |
1st Wave + 6 Archers, & 50 Catapults |
10 |
9 |
OK |
| 10 | 50% |
1200 Militia/Supply Tr. |
10k Swords + 70k Archers + 2840 Ballista |
1st Wave + 1000 Archers & 400 Ballista |
10 | 9 | OK |
| 10 | 50% |
1200 Militia/Supply Tr. |
80k Archers + 1 Militia |
1st Wave + 2126 Archers |
10 |
9 |
OK |
| 10 | 50% | 1200 Militia/Supply Tr. |
82k Archers + 4500 Ballistae + 3500 Catapults |
1st Wave + 5 Archers & 50 Catapults |
10 |
9 |
OK |
| 10 | 50% | 1200 Militia |
90k Archers + 10k Catapults |
1st Wave + 50 Catapults |
10 |
10 |
OK |
| 10 | 50% | 1199 MM + 1 Catapult |
80k Archers + 5000 Ballista + 5000 Rams + 10k Catapults |
1st Wave + 50 Catapults |
10 |
10 |
OK |
|
10 |
50% |
1199 MM + 1 Ballista |
32k Ballistas |
1st Wave + 402 Ballistas |
10 |
4+ |
OK |
|
10 |
50% |
1199 MM + 1 Ballista |
65k Archers
+ 25k Ballistas |
1st Wave + 1006 Archers + 350 Ballistas |
10 |
9+ |
OK |
10 |
50% |
1,199MM |
1st Wave + 1006 Archers + 400 Ballistas |
9 | 7+ | OK |
| Level | Sir Bor's Crest | Sir Ector's Crest | Sir Kay's Crest | Sir Bedivere's Crest | Sir Gawain's Crest | Sir Percival's Crest | Sir Galahad's Crest | Sir Lancelot's Crest | King Arthur's Crest |
|---|---|---|---|---|---|---|---|---|---|
| 5 | X | X | |||||||
| 6 | X | X | |||||||
| 7 | X | X | X | ||||||
| 8 | X | X | X | X | |||||
| 9 | X | X | X | X | X | ||||
| 10 | X | X | X | X | X |
Types of Wilderness
Mountains
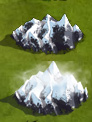 |
Mountains increase your ore production. |
Woods
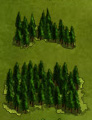 |
Woods increase your wood production. |
Hills
 |
Hills increase your stone production. |
Grasslands
|
 |
Grasslands level 4-6
Grasslands level 7-10
Grasslands increase your food production. |


Lakes
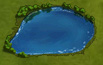 |
Lakes increase your food production. |
Plains
 |
Plains are where you build new cities. |
Bogs
 |
Bogs are impenetrable wilds. They cannot be conquered or attacked. They are just there so not every plain in the game can be occupied by a player.
Bogs can be successfully attacked with TP. |
Owning a Wilderness
In a city you can own as many wildernesses as high is you Castle level. This doesn't affect the level of wilderness you can own.
For example, if you have four cities with the four castles to level nine you can own up to 36 wildernesses.
You can keep attacking wildernesses with all your slots filled but you won't receive its benefits. However, Crests can be found in these wilderness you attack but you don't get to own.
Since July 20th, 2010 you can defend your wildernesses by adding traps or getting mercenaries.


The traps are bought with 200 Gold each (only gold, not other resources). Traps are destroyed when triggered, and will need to be rebuilt manually but they've got the advantage that they are built immediately. The number of traps you can have depends on the wilderness level (100 x wilderness level --> 600 traps for level 6)
Mercenaries are soldiers who will defend your lands for you while your troops are away. They do not consume food but they need to get paid with Gold . You can hire three different types of mercenaries: Novices (200 gold/hour), Intermediates (400 gold/hour) or Veterans (1000 gold/hour).
Novice Mercenaries
thumb|left|300px
| Wild Level | Militiamen | Scouts | Pikemen | Swordsmen | Archers | Cavalry | Heavy Cavalry | Ballistae | Catapults |
|---|---|---|---|---|---|---|---|---|---|
| 1 | ? | ? | ? | ? | ? | ? | ? | ? | ? |
| 2 | ? | ? | ? | ? | ? | ? | ? | ? | ? |
| 3 | ? | ? | ? | ? | ? | ? | ? | ? | ? |
| 4 | ? | ? | ? | ? | ? | ? | ? | ? | ? |
| 5 | ? | ? | ? | ? | ? | ? | ? | ? | ? |
| 6 | ? | ? | ? | ? | ? | ? | ? | ? | ? |
| 7 | ? | ? | ? | ? | ? | ? | ? | ? | ? |
| 8 | ? | ? | ? | ? | ? | ? | ? | ? | ? |
| 9 | ? | ? | ? | ? | ? | ? | ? | ? | ? |
| 10 | ? | ? | ? | ? | ? | ? | ? | ? | ? |
Intermediate Mercenaries
thumb|300px|left
| Wild Level | Militiamen | Scouts | Pikemen | Swordsmen | Archers | Cavalry | Heavy Cavalry | Ballistae | Catapults |
|---|---|---|---|---|---|---|---|---|---|
| 1 | ? | ? | ? | ? | ? | ? | ? | ? | ? |
| 2 | ? | ? | ? | ? | ? | ? | ? | ? | ? |
| 3 | ? | ? | ? | ? | ? | ? | ? | ? | ? |
| 4 | ? | ? | ? | ? | ? | ? | ? | ? | ? |
| 5 | ? | ? | ? | ? | ? | ? | ? | ? | ? |
| 6 | ? | ? | ? | ? | ? | ? | ? | ? | ? |
| 7 | ? | ? | ? | ? | ? | ? | ? | ? | ? |
| 8 | ? | ? | ? | ? | ? | ? | ? | ? | ? |
| 9 | ? | ? | ? | ? | ? | ? | ? | ? | ? |
| 10 | ? | 100 | ? | 250 | 350 | 400 | ? | ? | ? |
Veteran Mercenaries
thumb|300px|left
| Wild Level | Militiamen | Scouts | Pikemen | Swordsmen | Archers | Cavalry | Heavy Cavalry | Ballistae | Catapults |
|---|---|---|---|---|---|---|---|---|---|
| 1 | ? | 10 | ? | ? | ? | ? | ? | ? | ? |
| 2 | ? | 20 | ? | ? | ? | ? | ? | ? | ? |
| 3 | ? | 30 | ? | ? | ? | ? | ? | ? | ? |
| 4 | ? | 40 | ? | ? | ? | ? | ? | ? | ? |
| 5 | ? | 50 | ? | ? | ? | ? | ? | ? | ? |
| 6 | ? | 60 | ? | ? | ? | ? | ? | ? | ? |
| 7 | 0 | 70 | 0 | 0 | 0 | 112 | 322 | 266 | 0 |
| 8 | ? | 80 | ? | ? | ? | ? | ? | ? | ? |
| 9 | ? | 90 | ? | ? | ? | ? | ? | ? | ? |
| 10 | 25,000 | 100 | 12,000 | 6,000 | 3,000 | 320 | 230 | 450 | 50 |