(A Guide by Princejak of 323 Domain)

When using the Throne Room:
You need to know what type of player you will be, whether it be a Fluffer, an Attacker or a Defender. This will allow you to identify yourself with a strategy. Why is gaining a strategy important for using the Throne Room? Well, when you decide what type of player you are going to be, you can judge what throne card aspects you will need to obtain for the type of strategy you have chosen.
This is a page designed to help the user understand the throne room and what each item does and does not do. While you read everything you can about the throne room, you will experience new and important information on updating and enhancing items and or cards, Different attribute points that can be used to unveil new and deadly skills for defense and or offense. Some Items can be more valuable and some can be less, make sure that you know all their is to know about the items before you upgrade them. As you will read below, you will discover some information is Exclusive whilst other forms of information is from Kabam Guides and or Player Results due to experience with The Throne Room.
Some Important Throne Room Prospects, are Range , Range Debuffs and Troop Training Speed. Range Allows you to maximize the potent of an attack by making the distance you travel less and the distance in which your weapons are capable of proceeding further. Range Debuff does the complete opposite , and acts against your opponent , making his or her attack less powerful. Troop training speed is very helpful, it will knock off hours of training time in the long run, make sure you get a double with 15 and 40% or more for it to be any effective.
Something I have been picking up while using the Throne Room is that, Druid Items give out the best numbers, They speed up faster then others and upgrade and enhance better. So if your prepping for a set, Just a suggest go for Druid, on top of that when you complete the set you get a 150k upgrade to your Aetherstone Cap.
A Debuff Works for you, by Making your opponent weaker + or - the attribute skills you have.
A Buff Works for you by enhancing your ability to gain new expeirence in other categories, whether it be "Life", "Range" and or "attack", or "defend".
The Throne Room is in fact one of the most important Upgrades to the Kingdoms of Camelot game, giving it a unique Perception amongst other Facebook games and Kabam Games, It allows you to go to corners that where formerly unavailable to all users in the game.
Links of two major Throne Room Wiki pages are at the bottom of the Throne Room Setup Wiki page:
See Also Throne Cards Section "Card Max per Attribute" This will be inserted into the main Throne Room Page soon, so help if you can...
The Throne Room Guide Page is @ koc.wikia.com/Throne_Room
Types of Items are: Simple , Common , Uncommon , Rare , Epic and Wondrous , Unique
Unique items are unavailable as of 5/25/2012, unless won in a Kabam Special KoC Event.
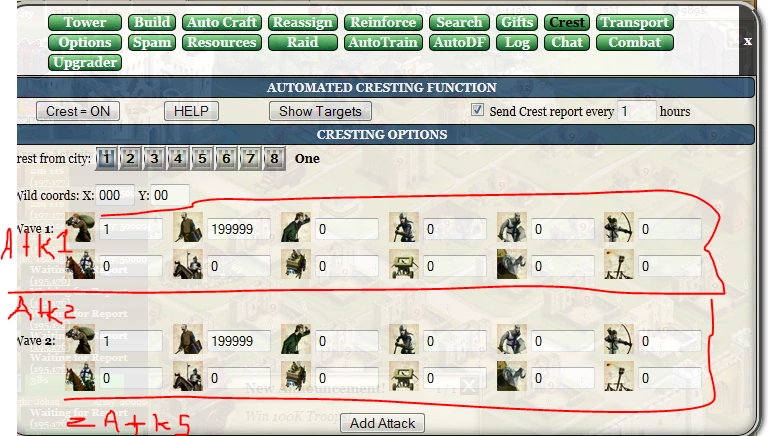
Setting Up Cresting To Auto Hit Player Cities or Wilds for Throne Room Cards:
Go to Bot , whilst in the map feature, Get a lvl 8-10 Owned player wild with nothing guarding it, set yourself up to hit it with the max amount of troops you can do, when you do lower amounts, it will sometimes glitch and halt all troop movement, Make sure your auto refresh is at 10 minutes when doing lower Amounts of troops.
While in the "Bot" Make sure you set it up , so that their is only one Cresting Que:
This does not sound like much, but you can set it up so the first wave and second waves are two separate attacks as described below in the photographs.
(REMEMBER, PLEASE ONLY HAVE ONE CREST TYPE GOING AT ONE TIME, IT WILL STALL THE BOT AND MAKE IT SO NOTHING HAPPENS.)

'Throne Room Help, A Kabam.com Guide:'
Under No Circumstances Does koc.wikia.Com Take any responsibility for the Throne Room Help Tutorial.
Also this tutorial is on the Kingdoms Of Camelots game, Throne Room Help Guide.
Throne Room Items are items that can be won in battle that provide bonuses to your Kingdom. There are over 300 different bonuses ranging in potency and effect so players are able to use different items to customize their Throne Rooms. Each Throne Room Item is comprised of 5 important pieces of information: Type, Quality, Suffix, Upgrade, and Effects.
Item Type
There are 5 different types of Throne Room Items: Chair, Window, Tapestry, Relic, and Seneschal. Item type is included in the item name and can be seen in the item icon.
Item Effects
Item Effects are the Buffs and Debuffs that a Throne Room Item provides to your Kingdom. These Effects can increase the strength of your Troops, decrease the strength of an enemy's Troops, increase resource production, and much more. You can view all the available Buffs and Debuffs here: Throne Room Effects Explained
All Throne Items can have up to 5 Effects, but not all of these Effects will initially be activated. The number of Effects activated is determined by the Item's Quality.
Item Quality
Item Quality determines how many Effects are active for a certain item. There are 6 different item Qualities: Simple, Common, Uncommon, Rare, Epic, and Wondrous.
Each Quality has the following number of active Effects:
- Simple - 0 Active Effects
- Common - 1 Active Effects
- Uncommon - 2 Active Effects
- Rare - 3 Active Effects
- Epic - 4 Active Effects
- Wondrous - 5 Active Effects
In an Item's tool tip active Effects will appear in black text while Inactive Effects will appear in grey text.
Item Upgrade
All items acquired start at +0. As the Upgrade increases, the five effects, will become stronger.
Item Suffix
The name of each Throne Room item is comprised of 3 parts: Quality, Type, and Suffix. The Suffix is determined by the item's 5th and most powerful Effect.
Example:
Throne Item name = Wondrous Chair of Rage
Type = Chair, Quality = Wondrous, Suffix = Rage (5th Effect boosts Attack)
You can view a full list of Suffixes here:
You can view a full list of Suffixes here: Throne Room Effects Explained
Acquiring Items
Players will be able to acquire Throne Room items as loot for Victorious Attacks against the following tile types:
- Wildernesses
- Barbarian Camps (Manual attacks only, not Barbarian Raids)
- Dark Forests
- Other Players’ Cities (Item drops, items can't be stolen from other players)
You are more likely to get a Throne Room Item when attacking higher level tiles (Higher level Castles for PVP attacks). You have the best chance of winning Throne room items when attacking high level Dark Forests.

Item Effects
Each Throne Room Item has Effects that can be applied to your Kingdom. Each Effect is either a Buff or a Debuff.
Buff Effects are bonus that benefit your kingdom by boosting the statistics of your Troops or Cities. Buffs can increase the attack of your troops, increase drop rates when you attack dark forests, reduce troop training time and much more.
Debuff Effects are negative bonuses that weaken your opponents in battle by decreasing the stats of their troops.
Here is a complete list of the Throne Room Effects

Inventory, Stats, and Pre-sets
Once a player has acquired a Throne Room Item, they can manage this item from the Throne Room. Click the "Throne" button on the Top Menu to open your Throne Room.
Inventory Tab
The Inventory tab is where you can view your Throne Room Items. Players can Equip, Unequip, and Salavage Items from this tab. Click here for more information on Equipping and Salvaging Items: Equipping Items.
A player is given three Inventory Rows to start with, each of which can contain 5 Throne Room items. A player can choose to purchase additional rows for Gems by clicking on the Green + on the top Greyed out inventory rows.
Items will be added to the Inventory in the order they are acquired and they cannot be moved around in the inventory. Items will continue to accumulate and can even reside in rows that have not been purchased. If there is an item in a row that has not been purchased it cannot be equipped. If a player wants to use that item, they will either need to purchase the row(s) necessary to access the item, or Salvage enough items to shift the remaining items into a row purchased by that player.
Only one of each item type can be equipped at a time. This means if a player has a fully equipped Throne Room, it would have one Chair, one Window, one Tapestry, one Relic, and one Advisor. When a player wants to change the Effects of his Throne Room, he can swap out items by equipping and unequipping items from the Inventory tab.
Stats Tab and Pre-sets
The Stats Tab is where players can view the active effects of their equipped items. This is also where a player can set up Pre-Sets. To avoid swapping out individual items, players can create a pre-set, which is a group of equipped items that are saved for later use. Players start out with 2 Pre-Sets for free, but you can buy additional presets for a total of 8. This means that players can save eight configurations of items (again x1 Chair, x1Window, x1 Tapestry, x1 Relic, x1 Advisor). This will also be a time saver for players. Equipping an item will require a 5 second cool down (similar to swapping Guardians). A Pre-Set, however, only requires that a player wait 5 seconds a single time instead of equipping and waiting for each item.

Equipping an Item
Click on the "Inventory" tab to view your inventory. This is where all of your acquired Throne Room Items are being stored. Hovering over an item will show you the item tool tip. Click on the item and you will be given the option to equip or salvage the item. Equipping an item, will add the item to your Throne Room, and the item's effects will be applied to your Kingdom. There is a 5 second cool down after you equip an item (see pre-sets section for more information).
Once an item has been equipped, an "E" will appear over the item icon.
You can view your equipped item's effects by clicking on the Stats Tab.
NEW! Throne Room Faction Bonus
Each Throne Room item is aligned with one of the three factions in Kingdoms of Camelot: Briton, Druid or Fey. Equipping 4 or more of the same faction will update the visual look of Throne Room along with providing the following additional bonus:
Briton: Having 4 or more Briton items equipped will reduce the Repair time of broken Throne Room items by 15%.
Druid: Having 4 or more Druid items equipped will reduce the revive time of all Troops in the Apothecary by 15%.
Fey: Having 4 or more Fey items equipped will increase each City’s Aetherstone cap to 1,150,000. Note- if unequipped, a user will be unable to gain additional Aetherstones until the amount of Aetherstones in that City is below 1,000,000.
Salvaging Items
If you chose to salvage and Item, the Item will be destroyed and you will receive a certain amount of Aetherstones based on the items quality and upgrade. Salvaging some items will not yield any Aetherstones. To Salvage an item click on the item icon and select "Salvage".
Unequipping Items
If you want to unequip the item, click on the item and select "Unequip". Once an item is unequipped, a player will stop receiving bonuses from its Effects.

The power to crush your enemies… that is what Upgrading a Throne Room item allows you to do. All Throne Room items start at +0 and can be upgraded up to +10. With every upgrade, all Effects on a Throne Room item will become more powerful (including inactive Effects). Power comes at a cost, however, with each Upgrade level becoming increasingly more difficult to achieve. Note- Unlike Enhancing Quality, Upgrading an item can get extremely difficult and will not be maxed out easily.
Accessing the Upgrade Panel
Upgrade can be accessed through an item's context menu. [1]
1. Name - The name of the item being Upgraded
2. Current - Current Effects on the item being Upgraded. The green check marks represent active Effects and the red X’s represent inactive Effects.
3. Next - The Effects of the item is the Upgrade is successful. Note- In the example, a successful Upgrade increases the power of each Effect.
4. Requirements (Resources) - The left portion of the Requirements section lists the amount of Aetherstones needed to Upgrade the item. If you do not have enough Aetherstones, you can spend Gems instead. If you have Aetherstones but do not wish to use them, you can select Gems from the left drop down list to use Gems instead.
5. Requirements (Items) – The right portion of the Requirements section lists optional Items that can be used in the next Upgrade attempt. These items cost Gems and can negate the effects of an unsuccessful Upgrade. If you do not have the Item you wish to use, you can spend Gems to buy and use the Item in the next Upgrade. The specific details of each item are listed in the last section of this guide.
6. Success Rate – Visually represents the difficulty of the next Upgrade. Using a Lesser Lucky Token or Lucky Token (explained below) will increase the success rate.
7. Upgrade Button – Pressing this button begins the Upgrade attempt. In an event that you are spending Gems (from any of the methods listed above) the total amount of Gems that will be deducted is listed in the Upgrade button.
Successfully Upgrading an Item
After pressing the Upgrade button, the attempt will either be successful or unsuccessful.
Unsuccessfully Upgrading an Item
Unfortunately, not every Upgrade attempt will be successful. When an Upgrade attempt is unsuccessful, one thing occurs:
The item breaks. This makes the item unusable until it is repaired. Some items (detailed below) can negate this effect.
Repairing a Broken Item
If an unsuccessful Upgrade causes an item to break, the Repair modal will open for that item. This modal lists the Effects of the item that has broken and gives two options: Instant Repair, and Start Repair. Instant Repair costs Gems and will do just that, instantly repair the broken item. If the Start Repair option is chosen, it will repair over time (over 45 seconds in the picture above). Note that only one item can be Repaired at a time.
A broken item in the Inventory will have a red X icon over its image. An item that is being repaired will have a hammer over its image.
Optional Items used when Upgrading
Mentioned above in several locations, there are a few optional items that can be purchased. These items can be purchased in the Shop or directly from the Upgrade panel. These items can do numerous things including protect an item from breaking or even increasing success rate. Please note- Since none of these items guarantee success, there is a chance that an Upgrade attempt could fail even if Gems are spent.
Lesser Protection Stone
Cost- 1 Gem, this item can also be crafted in your Fey Spire.
Prevents an item from breaking 50% of the time if an Enhance/Upgrade is unsuccessful. This item is consumed with each Enhance/Upgrade attempt.
Protection Stone
Cost- 2 Gems, this item can also be crafted in your Fey Spire.
Completely prevents an item from breaking if an Enhance/Upgrade is unsuccessful. This item is consumed with each Enhance/Upgrade attempt.
Lesser Lucky Token
Cost- 5 Gems, this item can also be crafted in your Fey Spire.
Increases success rate by 2x and completely prevents an item from breaking if an Upgrade is unsuccessful. This item is consumed with each Upgrade attempt.
Lucky Token
Cost- 15 Gems
Increases success rate by 4x and completely prevents an item from breaking if an Upgrade is unsuccessful. This item is consumed with each Upgrade attempt.

Enhancing a Throne Room Item
Ever found a Simple Throne Room item that had powerful effects on it? Well with Enhancement, an item’s Quality can now be changed! Using Aetherstones, a user can attempt to increase the Quality of their Throne Room Item using the Enhance panel.
Accessing the Enhance panel
Enhance can be accessed through an item’s context menu. [2]
1. Name - The name of the item being Enhanced
2. Current - Current Effects on the item being Enhanced. The green check marks represent active Effects and the red X’s represent inactive Effects.
3. Next - The Effects of the item is the Enhance is successful. Note- In the example, a successful Enhance will unlock the third Effect listed.
4. Quality Progress Bar - Shows the progress of an item from Simple to Wondrous.
5. Requirements (Resources) - The left portion of the Requirements section lists the amount of Aetherstones needed to Enhance the item. If you do not have enough Aetherstones, you can spend Gems instead. If you have Aetherstones but do not wish to use them, you can select Gems from the left drop down list to use Gems instead.
6. Requirements (Items) – The right portion of the Requirements section lists optional Items that can be used in the next Enhance attempt. These items cost Gems and can negate the effects of an unsuccessful Enhance. If you do not have the Item you wish to use, you can spend Gems to buy and use the Item in the next Enhance. The specific details of each item are listed in the last section of this guide.
7. Success Rate – Visually represents the difficulty of the next Enhance. Using a Mystics Orb (explained below) will increase the success rate.
8. Enhance Button – Pressing this button begins the Enhance attempt. In an event that you are spending Gems (from any of the methods listed above) the total amount of Gems that will be deducted is listed in the Enhance button.
Successfully Enhancing an Item
After pressing the Enhance button, the attempt will either be successful or unsuccessful. If successful, the item’s Quality will increase by 1.
Unsuccessfully Enhancing an Item
Unfortunately, not every Enhance attempt will be successful. When an Enhance attempt is unsuccessful:
The item breaks. This makes the item unusable until it is repaired. Some items (detailed below) can negate this effect.
Repairing a Broken Item
If an unsuccessful Upgrade causes an item to break, the Repair modal will open for that item. This modal lists the Effects of the item that has broken and gives two options: Instant Repair, and Start Repair. Instant Repair costs Gems and will do just that, instantly repair the broken item. If the Start Repair option is chosen, it will repair over time (over 45 seconds in the picture above). Note that only one item can be Repaired at a time.
A broken item in the Inventory will have a red X icon over its image. An item that is being repaired will have a hammer over its image.
Optional Items used when Enhancing
Mentioned above in several locations, there are a few optional items that can be purchased. These items can be purchased in the Shop or directly from the Enhance panel. These items can do numerous things including protect an item from breaking or increasing success rate. Please note- Since none of these items guarantee success, there is a chance that an Enhance attempt could fail even if Gems are spent.
Lesser Protection Stone
Cost- 1 Gem
Prevents an item from breaking 50% of the time if an Enhance/Upgrade is unsuccessful. This item is consumed with each Enhance/Upgrade attempt.
Protection Stone
Cost- 2 Gems
Completely prevents an item from breaking if an Enhance/Upgrade is unsuccessful. This item is consumed with each Enhance/Upgrade attempt.
Mystics Orb
Cost- 12 Gems
Completely prevents an item from breaking if an Enhance is unsuccessful and increases the success rate by 2x. This item is consumed with each Enhance attempt.
Mats Strategy-Jan-March
Where to get Throne Room Items:
Wildernesses
Barbarian Camps (Manual attacks only, not Barbarian Raids)
Dark Forests
Other Players’ Cities (Item drops, items can't be stolen from other players).
I.E. You can do the old school barbing, or cresting... ya'll remember cresting...
WHAT KINDS
You can have 5 different items at a time per set: Chair, Window, Tapestry, Relic, and Seneschal. You can have 1 of each.
with the 5 different items... they have 6 different qualities...
each quality shows how many different effects they have:
Simple - 0 Active Effects
Common - 1 Active Effects
Uncommon - 2 Active Effects
Rare - 3 Active Effects
Epic - 4 Active Effects
Wonderous - 5 Active Effects
So you can have 5 different items and each one can have up to 5 different efects... so that means each 'set' you have can have UP TO 25 EFFECTS ACTIVE!
What I'm tryign to do, is have 1 for attack, 1 for defence, maybe buy a 3rd for bulding...
there's over 300 effects they are goig to have... some are...
range increase - (could be used to have cats hit 2-1 on lvl 11 fletching vs lvl 11 fletching
life increase
defence increase
speed up training time
and a bunch to screw anybody attacking your city... like
- attack debufs
- defence debufs
- range distance
and a ton of others...
You can use all of these together... if you go into your throne room and inventory, you can equip them... and you can 'salvage' them to make room to for better ones.
If you have them equiped you can click on stats to show you all your effects you have in play... so far... after a few hours of it.. this is mine so far... for defence... FOR NOW!!!
____________________________
5% Defense
5% Resource Production
30% Wood Production
10% Bonus vs. Barbarian Camps
-2% Attack Debuff
-40% Defense Debuff
-1% Horsed Combat Speed Debuff
-5% Horsed Defense Debuff
30% Stone Production
____________________________
they have a 1% range effect
that would be nice... cause if somebody is defending with 300k cats 300k balls 900k archers lvl 11 fletching... a 300k cats attack should kill them all... that 1% should give your cats a shot in before the other cats shoot...
(BUFFS FOR RANGE:)
(fletching table:)
cats lvl 11 fletching = 2325 Range
Cats lvl 10 fletching = 2250 range
balls lvl 11 fletching = 2170 Range
Balls lvl 10 Fletching = 2100 range
archer lvl 10 fletching = 1800
archer lvl 11 fletching = 1860
*THIS IS PROVIDING THEY HAVE NO RANGE BUFFS OR DEBUFFS
*REMEMBER CAVS AND HC'S WILL LAND ABOUT 3 OR 4 ROUNDS:
LVL 11 VS LVL 11 FLETCHING
HOW TO MAKE ARCHERS HIT BEFORE CATS
ARCHERS AT 39% range BUFF
(pretty much if they have no buffs, and they hit you w/ cats... if you have like 2 million archers... they should kill all the
cats no losses)
(ARCHERS HIT BEFORE BALLS
ARCHERS AT 26% BUFF)
(MAKE BALLS HIT BEFORE CATS LVL 11 VS LVL 11
BALL AT 11% RANGE BUFF)
*This might make a trade off of 2-1
(Give your cats 2 hits... to their 1...
I'm guessing ever 5% would be 1 extra hit... because of fletchign lvl 11 vs 10 its 2-1 cat trade off and every fletchign gives ya
5% increase.)
*SOME MASSIVE PWNAGE NOW.*
LVL 11 (you) VS LVL 10 (ball lickers) FLETCHING
ARCHERS BEFORE BALLS
20% range buff would be the at the same time
ARCHERS BEFORE CATS
33% range buff
BALLS TO HIT BEFORE CATS
6% range buff
CATS VS CATS...
SAME APPLYS AS BEFORE... AT LEAST I THINK... YOUR ALREADY 2-1...
NO not doing it for lvl 10 fletchign... you shouldn't have it... SHAME ON YOU IF YOU HAVE LVL 10 FLETCHING...
Item Upgrade
All items acquired start a +0. As the Upgrade increases, the five effects, will become stronger. Item upgrading is not currently available, but this functionality will be added in an upcoming release. Not sure what that is or how much it cost (prob be some nice gems to make the koc asses even richer.)
THRONE ROOM UPGRADES READ ASAP!
- HE JIST OF IT... AND THE WARNINGS!*
1.FIRST!!! DO NO TRY TO ENHANCE ANYTHIGN YET!!! PLEASE JUST READ
1.1long story short i fucked up and went from 2% range back down to 1% range... cause i fucked up...
1.2okay now that ya got that... listen my terra byets!!!
1.3you can upgrade and enhance each item...
1.4It cost what i saw from 3k aetherstones to 35k per try might me more might be less ones...
also cost gems... AETHERSTONES ARE FREE... IF NEED SOME ASK!
THE UPGRADE - PRO'S AND CONS
Upgrading an item has a chance to increase the power of its Effects
A successful Upgrade will increase the item's Upgrade Level by one
An unsuccessful Upgrade will cause the item to break
Optional items below negate unsuccessful effects and increase success rate
HUGE PROS
an upgrad makes the stuff on it increased... I.E. 1% range buff into 1.5% meaning you can kill 2-1 on somebody w/ only 1% buff on the first upgrade... FROM 1.5% to 2.5 % the second... thats where i'm at now... 1.5%
CONS- item breaks... meaning you have to repair it... AND you can't use it until its repaired... so no big deal...
ONLY TAKES A FEW MINS...
ENHANCE
Enhancing an item has a chance to increase its Quality
A successful Enhance will increase the item's Quality by one
An unsuccessful Enhance reduces the Quality by one and breaks the item
Optional items below negate unsuccessful effects and increase success rate
MEANING THAT IF ITS UNSUCCESSFUL then you loose quality form it... I.E. going form RARE to UNCOMMON (THATS WHERE I FUDGED IT) not knowing that...
HUGE PROS - FINALLY being able to unlock the wonderious quality and that 5% range ya'll been wishing ya had!
HUGE BIG F'N CON - it breaks... big deal... fix it... takes a few mins... but... REDUCES THE QUALITY BY 1 MEANING RARE - UNCOMMON AND UNCOMMON TO COMMON AND COMMON TO SIMPLE
OKAY NOW THAT YA GOT THAT DOWN... here's where they make their money!!!!!
THE ITEMS...
Lesser Protection Stone
Cost- 1 Gem
Prevents an item from breaking 50% of the time if an Enhance/Upgrade is unsuccessful. This item is consumed with each Enhance/Upgrade attempt.
50% chance of saving 5 mins... big deal...
AS IT READS AN ENHANCE FAILURE WILL STILL DOWNGRADE THE QUALITY remember RARE TO UNCOMMON... AND SO ON
Protection Stone
Cost- 2 Gems
Completely prevents an item from breaking if an Enhance/Upgrade is unsuccessful. This item is consumed with each Enhance/Upgrade attempt.
AGAIN...
save you like 5 mins... big deal...
AS IT READS AN ENHANCE FAILURE WILL STILL DOWNGRADE THE QUALITY remember RARE TO UNCOMMON... AND SO ON
Lesser Mystics Orbs
Cost- 5 Gems
Completely prevents an item from breaking or downgrading in Quality if an Enhance is unsuccessful. This item is consumed with each Enhance attempt.
IF YOUR GOING TO TRY AN ENHANCE PLEASE USE THIS!!!! EACH ONE COST 5 GEMS and i failed 10 enhancements already... not trying any anytime soon gonna start throning to get some more rare items... they all simple again :( well except 1 :)
Mystics Orb
Cost- 12 Gems
Protection Stones
Completely prevents an item from breaking or downgrading in Quality if an Enhance is unsuccessful and increases the success rate by 2x. This item is consumed with each Enhance attempt.
AGAIN... once i get somethign that only needs 1 upgrade for a good range... I'M GOING TO USE THIS... or at least try 2 times before i put my laptop through my tv...
ALSO ONE MORE
Lucky Tokens
Lucky Tokens improve your chance of a successful Upgrade and completely protect your items from breaking! The Lesser Lucky Token increases your success rate by x2 and the Lucky Token increases your success by 4x.
PLEASE BE CARFULL BECAUSE THE UPGRADE IS RIGHT NEXT TO SALVAGE... SO PLEASE, AND YES... I'M SERIOUS WHEN I SAY THIS...
DONT DRINK AND UPGRADE!!!
YOU MIGHT MISCLICK AND SALVAGE
THRONE ROOM UPDATES TO GET RANGE THE CHEEPEST
And this is what i'm doing... could be a better way, but this is matts way...
AGAIN... EVERYTHIGN WOULD BE DIFFERENT, AND BE ALL LUCK... SO PLEASE DONT BE MAD AT ME IF IT DOESNT WORK FOR YOU...
MY GOAL - GET TO 20%+ RANGE SPENDING LESS THEN 100 GEMS
Don't try to go for that wonderious item... you'll the odds are about 1/200 for getting the enhancement per try, instead there are alot of items with 1% range as a rare quality... DO NOT THROW THEM OUT...
thank small and effective... kinda like areyouready's man parts, well except for the effective part YES I KNOW HE'S NOT HERE ANYMORE, I'M STILL RIPPING ON HIM!!
1% range base our awesome chancy UPGRADED that up to 6%, yes took a few days of constant clicking... but each UPGRADE only cost aetherstones... and time... so if you fail... keep going... you dont need to spend gems to get it there
a 2% base range item can be upgraded to 17% at +5
so pretty much...
1% can be 6% @ +4 and 8.5% @ +5
and 2% can be 12% @ +4 and 17% @ +5
So what I will be doing is trying to get 1 of each item, chair, dude, window, banner, table, each @ 1% range... and upgrade them...
What i'm doing ATM... is i just got a simple item, and I've been ENHANCING IT to common, and trying to get 2 enhancements in a row trying to get it to uncommon... once i get it there... i'm going to hold off and just keep
UPGRADEING IT untill it is a 6% item. the same thing i'm doing with an uncommon chair. UPGRADING untill it is up to 6% and once i have the gems... i will be clicking ENHANCE from UNCOMMON to RARE WITH THE 5
GEM ORB... because each try would only be 5 gems, so in my eyes... looks like the easiest and cheepest way to get the highest range with out spending a few hundred bucks. right now I have 1 - 4% table, and 1 12% table. I have that 12% table equipted...and @ 12 % you can kill cats 3-1 and balls 3-1 and you can also kill BALLS with ARCHERS... message me if ya need to know how.. but if ya dont belive me you can check the attacks from matt to derek in ally reports..
pretty much if you can get 1 of each range item... you can upgrade them to 6% and give yourself 30% range.
my odds... again depends on luck... but these are w/o any gems spent
ENHANCEMENTS -
going from simple to common - about 1/3 (takes 1 min 15 seconds to repair)
Going from common to uncommon - about 1/10 (takes 3 mins to repair)
AGAIN you might get them 1st try, you might get them 30th try... YOU DONT KNOW. a few times took me 9 tries to go from simple to common, sometimes took me first try...
as to prove to you guys that its all odds... i already had that 4% table range... and i also had a rare item that the epic would make it 2% range... for the hell of it, i just hit enhance... AND IT WORKED FIRST TRY... so its all luck... *played the lotto after the one, still poor...
right now...
1 epic table +4 for 12% range
1 uncommon chair @ +4 (RARE WOULD BRING ME 6% RANGE)
1 simple window +0 (RIGHT NOW, TRYING TO GET THAT TO UNCOMMON, ONCE ITS UNCOMMON goign to UPGRADE THE F OUT OF THAT to give me another 6% range item @ RARE)
so for me to get to 24% range will take me just 2 enhancements from uncommon to rare, witch im'a use the gems for that alone, and alot of upgrading, witch is gonna just take me time...
oh yeah @ 26% you can just send archers and with the right attack increaces (40% ore guardian and 50% attack maybe blood fury) should amke arecher kill balls 2-1 lvl 11 fletch vs lvl 11 fletch IF no cats
any questions just ask
When Updating This Forum Page, Please Put Viable Information , so that the player does not mess up his or her Throne Room.