| (49 intermediate revisions by 37 users not shown) | |||
| Line 1: | Line 1: | ||
__TOC__ |
__TOC__ |
||
| + | Crests are randomly found from a level 5-10 wilderness after a victorious attack. They can also be purchased from the [[shop]] and be obtained from chests. |
||
| − | Crests have two features. It is mainly used to finish the quests that are needed to receive the [[Third City|third]], [[Fourth City|fourth]], [[Fifth City|fifth]], [[Sixth City|sixth]] and seventh [[City|city]] deeds. The Seals were introduced to the game starting with the sixth city deed. The second feature is to increase a knights loyalty, alas loyalty has not been built into the game yet. |
||
| + | A certain combination of crests reward you with the [[Third City|third]], [[Fourth City|fourth]], [[Fifth City|fifth]], [[Sixth City|sixth]], seventh, and eighth [[City|city]] [[City_Deed|deeds]]. The Seals were introduced to the game starting with the sixth city deed. |
||
| − | Crests can be gained in two ways. You can either attack a wilderness and be victorious for a chance to get a crest, please see the drop rate table below, or by purchasing different chests in the [[shop]] for different crests. |
||
| + | Crests can also be used to increase a knights [[loyalty]] |
||
| − | ==Types of crest== |
||
| + | ==Types of Crest/Seal== |
||
| − | There are several types that can be found in the game. |
||
| + | |||
| + | |||
| + | #==Only certain types of crests are dropped in each level wild:== |
||
{| align="center" border="1" cellpadding="1" cellspacing="0" style="border-collapse: collapse; font-size: 11px;" |
{| align="center" border="1" cellpadding="1" cellspacing="0" style="border-collapse: collapse; font-size: 11px;" |
||
| Line 58: | Line 61: | ||
! style="text-align: center; vertical-align: middle; width: 150px;"|King Arthur's Crest |
! style="text-align: center; vertical-align: middle; width: 150px;"|King Arthur's Crest |
||
! style="text-align: center; vertical-align: middle; width: 250px;"|''Increases Knights loyalty by 60% '' |
! style="text-align: center; vertical-align: middle; width: 250px;"|''Increases Knights loyalty by 60% '' |
||
| − | ! style="text-align: center; vertical-align: middle; width: 150px;"| 8 |
+ | ! style="text-align: center; vertical-align: middle; width: 150px;"| 8+ |
|- |
|- |
||
| style="text-align: center; vertical-align: middle; width: 75px; height: 75px;"|[[File:Morgana.png]] |
| style="text-align: center; vertical-align: middle; width: 75px; height: 75px;"|[[File:Morgana.png]] |
||
! style="text-align: center; vertical-align: middle; width: 150px;"|Morgana's Seal |
! style="text-align: center; vertical-align: middle; width: 150px;"|Morgana's Seal |
||
! style="text-align: center; vertical-align: middle; width: 250px;"|N/A |
! style="text-align: center; vertical-align: middle; width: 250px;"|N/A |
||
| − | ! style="text-align: center; vertical-align: middle; width: 150px;"| 8 |
+ | ! style="text-align: center; vertical-align: middle; width: 150px;"| 8+ |
|- |
|- |
||
| style="text-align: center; vertical-align: middle; width: 75px; height: 75px;"|[[File:1111.jpg]] |
| style="text-align: center; vertical-align: middle; width: 75px; height: 75px;"|[[File:1111.jpg]] |
||
| Line 69: | Line 72: | ||
! style="text-align: center; vertical-align: middle; width: 250px;"|N/A |
! style="text-align: center; vertical-align: middle; width: 250px;"|N/A |
||
! style="text-align: center; vertical-align: middle; width: 150px;"| |
! style="text-align: center; vertical-align: middle; width: 150px;"| |
||
| − | 8 |
+ | 8+ |
|- |
|- |
||
| style="text-align: center; vertical-align: middle; width: 75px; height: 75px;"|[[File:Stag.jpg]] |
| style="text-align: center; vertical-align: middle; width: 75px; height: 75px;"|[[File:Stag.jpg]] |
||
! style="text-align: center; vertical-align: middle; width: 150px;"|Stag King's Seal |
! style="text-align: center; vertical-align: middle; width: 150px;"|Stag King's Seal |
||
! style="text-align: center; vertical-align: middle; width: 250px;"|N/A |
! style="text-align: center; vertical-align: middle; width: 250px;"|N/A |
||
| − | ! style="text-align: center; vertical-align: middle; width: 150px;"| 8 |
+ | ! style="text-align: center; vertical-align: middle; width: 150px;"| 8+ |
|- |
|- |
||
| style="text-align: center; vertical-align: middle; width: 75px; height: 75px;"|[[File:1113.jpg.png]] |
| style="text-align: center; vertical-align: middle; width: 75px; height: 75px;"|[[File:1113.jpg.png]] |
||
! style="text-align: center; vertical-align: middle; width: 150px;"|Pendragon Seal |
! style="text-align: center; vertical-align: middle; width: 150px;"|Pendragon Seal |
||
! style="text-align: center; vertical-align: middle; width: 250px;"|N/A |
! style="text-align: center; vertical-align: middle; width: 250px;"|N/A |
||
| − | ! style="text-align: center; vertical-align: middle; width: 150px;"| 8 |
+ | ! style="text-align: center; vertical-align: middle; width: 150px;"| 8+ |
|- |
|- |
||
| style="text-align: center; vertical-align: middle; width: 75px; height: 75px;"|[[File:Pen.png]] |
| style="text-align: center; vertical-align: middle; width: 75px; height: 75px;"|[[File:Pen.png]] |
||
! style="text-align: center; vertical-align: middle; width: 150px;"|Lady Of The Lake´s Seal |
! style="text-align: center; vertical-align: middle; width: 150px;"|Lady Of The Lake´s Seal |
||
! style="text-align: center; vertical-align: middle; width: 250px;"|N/A |
! style="text-align: center; vertical-align: middle; width: 250px;"|N/A |
||
| − | ! style="text-align: center; vertical-align: middle; width: 150px;"| 8 |
+ | ! style="text-align: center; vertical-align: middle; width: 150px;"| 8+ |
|- |
|- |
||
| style="text-align: center; vertical-align: middle; width: 75px; height: 75px;"|[[File:Lad.png]] |
| style="text-align: center; vertical-align: middle; width: 75px; height: 75px;"|[[File:Lad.png]] |
||
! style="text-align: center; vertical-align: middle; width: 150px;"|Merlin´s Seal |
! style="text-align: center; vertical-align: middle; width: 150px;"|Merlin´s Seal |
||
! style="text-align: center; vertical-align: middle; width: 250px;"|N/A |
! style="text-align: center; vertical-align: middle; width: 250px;"|N/A |
||
| − | ! style="text-align: center; vertical-align: middle; width: 150px;"| |
+ | ! style="text-align: center; vertical-align: middle; width: 150px;"| 1+ |
| + | |- |
||
| + | | style="text-align: center; vertical-align: middle; width: 75px; height: 75px;"|[[File:Aetherseal.jpg]] |
||
| + | ! style="text-align: center; vertical-align: middle; width: 150px;"|Aetherseal |
||
| + | ! style="text-align: center; vertical-align: middle; width: 250px;"|N/A |
||
| + | ! style="text-align: center; vertical-align: middle; width: 150px;"| |
||
| + | |- |
||
| + | | style="text-align: center; vertical-align: middle; width: 75px; height: 75px;"| |
||
| + | [[File:Ysbadden_Seal.jpg]] |
||
| + | ! style="text-align: center; vertical-align: middle; width: 150px;"|Ysbadden Seal |
||
| + | ! style="text-align: center; vertical-align: middle; width: 250px;"|N/A |
||
| + | ! style="text-align: center; vertical-align: middle; width: 150px;"| |
||
| + | |- |
||
| + | | style="text-align: center; vertical-align: middle; width: 75px; height: 75px;"| |
||
| + | [[File:Sidhe_Seal.jpg]] |
||
| + | ! style="text-align: center; vertical-align: middle; width: 150px;"|Sidhe Seal |
||
| + | ! style="text-align: center; vertical-align: middle; width: 250px;"|N/A |
||
| + | ! style="text-align: center; vertical-align: middle; width: 150px;"|2+ DF |
||
|} |
|} |
||
| − | * Seals cannot increase loyalty. |
+ | * Seals cannot increase [[loyalty]].<ref>[http://wikiduh.com/153/quick-tips-for-kindoms-of-camelot-web-game See table]</ref> |
==Where to find them== |
==Where to find them== |
||
| − | Crests are |
+ | Crests are obtained (Dropped) when your attack on an unowned [[Wilderness]] of level 5 or greater is successful. See [[Tourney#Strategy_2|Tournament of Crests]] strategy section for advice on collecting crests from wilds. When you win a crest, it will be listed in the battle [[report]] in the Resources Won area. Or, you can check under my [[shop|items]] to see how many crests you currently have. The table in the section above includes a column for which level wildernesses each can be found. Crests drop on any successful attack, whether you "conquer" the wilderness or not. Cresting is normally done as repeated attacks on a wild at short range from a city that has all of its wild slots occupied. That wild is never captured so it can be attacked immediately for another crest, before the troops re-build, so that only a very small number of troops need to be assigned. |
| + | |||
| + | Attacking a wild owned by another player does not give any dropped items. (i think, Bytebasher ed.) |
||
These are the chances of drop calculated on the [[Crest_Drop_Research]] page, per attack, as per 25/09/2010 |
These are the chances of drop calculated on the [[Crest_Drop_Research]] page, per attack, as per 25/09/2010 |
||
| − | ==='''The |
+ | ==='''The Old Way'''=== |
| + | It was originallly thought that one had to perform a capture-abandon cycle on a wilderness to obtain crests, seals or other drop items. This may have been true early one, but as of early 2013 (when I started cresting) it was no longer needed. |
||
| − | Crests are randomly placed throughout wilds every hour. If you were to build lists of certain lvl wilds you want to hit, you could hit them every hour instead of looking through other wilds. This way, it's easier and quicker to find the crests you need. |
||
| + | ==='''The Easy Way'''=== |
||
| − | Also if you stay on your 'Map' screen and hit 5 of the same type and lvl of wilds, your chances of getting crests go up. |
||
| + | You can attack the same wild repeatedly getting crests at a rate between 4 and 20% from each attack. Assign 5000 Calvary to repeatedly attack any level 7-9 wild at short range and you will reap crests, seals, Lancelot's Training tokens, Throne Room and Champion cards in good numbers. Attacking Woods has the added possibility of dropping Pristine Yew Branches, needed to build Flame Archers. |
||
| − | Edit 1/15/11 |
||
| + | ===='''Wilds Do Not Have to Have Defenses In Order To Win Crests'''==== |
||
| − | Ok, I don't want to step on anyone's toes but, if anyone understands what goes into programming a game like this, you know that it simply doesn't make sense to randomly place crests every hour across a 750 x 750 grid. |
||
| + | Wilds give the same chance to drop items each time you attack, even when those attacks come only seconds apart. There do not have to be troops regenerated and there is no waiting time to "re-stock" the wilderness with items. |
||
| − | The simple way to program is to create a drop rate percentage which applies to any wild which is at full. |
||
| + | ===='''You cannot attack an ally's wilds'''==== |
||
| + | Someone wondered about what would drop if you attacked an ally's wild, but as the game does not allow you to do that, so the question is moot. |
||
| + | ===='''Ron's Report'''==== |
||
| + | I have done 115 repeated attacks on a level 9 wild with 1000 archers over a 27 minute period and got no crests/seals. This means that the probability of getting a crest/seal is less than 2.57% (95% confidence). The expected frequency of getting a crest/seal in a level 9 wild is 6.15%, so even if an unregenerated wild occasionally produces a crest, it happens a lot less than the frequency in regenerated or partially regenerated wilds. |
||
| − | Now given this knowldge, there is a truly easy way to crest hunt without worry of accidentally hitting one owned by another or recently attacked by someone else (making it ineligible). |
||
| − | |||
| − | Whenever you abandon a wilderness from your castle, it is immediately restored to full defense, so it is eligible to drop a crest. |
||
| + | Edit 1 April 2011 by Ron Lacey |
||
| − | You can actually attack the same wild over and over and over again getting crests at a rate between 4 and 20% |
||
| + | Here is a list of Crests and where I found them based on 200 attacks. The best result was Level 7 woods for 5th city crests. |
||
| − | Many have actually gotten crests back to back from the same wild this way. I have personally collected as many as 6 crests in an hour from attacking the same wild (only 1:30 away) 30 to 40 times in an hour. Give it a try and see for yourself. |
||
| + | Actual crests locations and number found: |
||
| + | ===<span style="font-size:13px;">Sir Kay</span>=== |
||
| + | Lvl 5 Woods - 3<br />Lvl 6 Lake - 2<br />Lvl 7 Mtn - 3<br />Lvl 7 woods - 2 |
||
| − | Edit 20th March 2011 by Frankire |
||
| + | Sir Bor<br />Lvl 5 Woods - 5<br />Lvl 6 lake - 4<br />Lvl 7 Woods - 6 |
||
| − | I have done 196 consecutive attack-abandon cycles on a single level 9 hill and obtained 37 crests/seals. This is a 18.8% find rate which is much more than the overall observed find rate for level 9 wilds in the crest drop research table (6.89%). Anyone any idea why attack-abandon cycling might increase the find rate? Have the developers increased the drop rate recently? The crests/seals were spread pretty evenly across the whole range of available crests, so attacking a hill only doesn't seem to reduce the spread of cretss available. |
||
| + | Sir Ector<br />Lvl 5 Woods - 3<br />Lvl 6 Plain - 2<br />Lvl 6 Lake - 1<br />Lvl 7 Woods - 1 |
||
| − | '''EDIT 3/11/2011''' |
||
| + | Plain & Mtn - 1 each |
||
| − | '''Wilds Do Not Have to Have Defenses In Order To Win Crests:''' |
||
| + | Sir Bedivere<br />Lvl 6 Lake - 1<br />Lvl 6 Grass - 1<br />Lvl 7 Wood - 1<br />Lvl 8 Mtn - 1 |
||
| − | It is a fact, that you do not have to wait for wilds to regenerate their troops or defensesin order to win a crest. On more than one occasion I have won a crest fighting litterally no one. I sent in 1 Sucicide squad, 2 main army, and then 3, 4, 5, etc.... small forces that fight NO ONE, win the battle and win crests, see below. |
||
| + | Sir Galahad<br />Lvl 7 Wood - 3 |
||
| + | Sir Gawain's<br />Lvl 7 Wood - 6<br />Lvl 8 Lake - 1 |
||
| − | '''This wilderness cannot be conquered because you must upgrade your Castle or abandon another wilderness''' |
||
| + | Sir Percival<br />Lvl 7 Wood - 3 |
||
| − | You were victorious! |
||
| + | Sir Lancelot<br />Lvl 7 Wood - 3<br />Lvl 8 Wood - 1 |
||
| − | The Attackers secured the Wilderness. |
||
| + | ==='''The Hard but Second fastest Fast Way by Xeger And corrected by Ian Moffett:'''=== |
||
| − | Loot |
||
| − | |||
| − | '''Gold:''' 0 |
||
| − | |||
| − | '''Food:''' 0 |
||
| − | |||
| − | '''Wood:''' 0 |
||
| − | |||
| − | '''Stone:''' 0 |
||
| − | |||
| − | '''Ore:''' 0 |
||
| − | |||
| − | '''Sir Percival's Crest: '''1 |
||
| − | |||
| − | '''Attackers'''(ballsballsballs) Knight Combat Skill: 95 |
||
| − | {| cellpadding="0" cellspacing="0" class="trttl" |
||
| − | | |
||
| − | | class="trnm"|Troops |
||
| − | | class="startcol"|Fought |
||
| − | | class="endcol"|Survived |
||
| − | |- |
||
| − | | |
||
| − | | class="trnm"|Archer |
||
| − | | class="startcol"|99526 |
||
| − | | class="endcol"|99526 |
||
| − | |} |
||
| − | '''Defenders'''(Enemy) |
||
| − | Knight Combat Skill: None |
||
| − | |||
| − | No Troops Defended |
||
| − | |||
| − | Now, I do not know what this means for crest hunting in general, I am just passing the info along. I would like to know, if you attack an owned wild (say an ally) can you get crests from that? If you could, that would be great because you fight no one the whole time and if you're already full of wilds, you won't take your friend wild away. |
||
| − | |||
| − | EDIT 14th March 2011 |
||
| − | |||
| − | I have done 115 repeated attacks on a level 9 wild with 1000 archers over a 27 minute period and got no crests/seals. This means that the probability of getting a crest/seal is less than 2.57% (95% confidence). The expected frequency of getting a crest/seal in a level 9 wild is 6.15%, so even if an unregenerated wild occasionally produces a crest, it happens a lot less than the frequency in regenerated or partially regenerated wilds. |
||
| − | |||
| − | ==='''The Hard but Fast Way by Xeger:'''=== |
||
For you die hards who have been getting aggravated by crest farming, I got ya covered. The easiest way to get your 3rd and 4th city deed, is to select a type of wild, and attack that same type relentlessly. Don't stop until you win a crest. Send out three or four waves consisting of your suicide squad, and your main force. Once you have obtained a crest, wait for the rest to get back in, then attack a new type of wild. But don't be suprised if you attacked six times and did not get one, I can assure you that you will. And, if you time it right, a minute or less between your main attack forces, you could score twice, So get those fingers ready, and that mouse set. To acheive any of this you need to be quick, not super-fast. Just quick. |
For you die hards who have been getting aggravated by crest farming, I got ya covered. The easiest way to get your 3rd and 4th city deed, is to select a type of wild, and attack that same type relentlessly. Don't stop until you win a crest. Send out three or four waves consisting of your suicide squad, and your main force. Once you have obtained a crest, wait for the rest to get back in, then attack a new type of wild. But don't be suprised if you attacked six times and did not get one, I can assure you that you will. And, if you time it right, a minute or less between your main attack forces, you could score twice, So get those fingers ready, and that mouse set. To acheive any of this you need to be quick, not super-fast. Just quick. |
||
| Line 191: | Line 180: | ||
{| align="center" border="1" cellpadding="1" cellspacing="1" style="border-collapse: collapse; font-size: 11px; width: 750px;" |
{| align="center" border="1" cellpadding="1" cellspacing="1" style="border-collapse: collapse; font-size: 11px; width: 750px;" |
||
|+Crest Drop Per Wilderness |
|+Crest Drop Per Wilderness |
||
| + | |- |
||
! scope="row" style="background-color: rgb(255, 204, 51);"|Crest |
! scope="row" style="background-color: rgb(255, 204, 51);"|Crest |
||
! scope="col" style="background-color: rgb(255, 204, 51);"|Level 5 |
! scope="col" style="background-color: rgb(255, 204, 51);"|Level 5 |
||
| Line 244: | Line 234: | ||
| style="text-align: center;"| 1.13% |
| style="text-align: center;"| 1.13% |
||
| style="text-align: center;"|1.61% |
| style="text-align: center;"|1.61% |
||
| − | | style="text-align: center;"| |
+ | | style="text-align: center;"|1.77% |
| style="text-align: center;"|'''-''' |
| style="text-align: center;"|'''-''' |
||
|- |
|- |
||
| Line 252: | Line 242: | ||
| style="text-align: center;"| 0.45% |
| style="text-align: center;"| 0.45% |
||
| style="text-align: center;"|1.45% |
| style="text-align: center;"|1.45% |
||
| − | | style="text-align: center;"|1. |
+ | | style="text-align: center;"|1.13% |
| style="text-align: center;"|'''-''' |
| style="text-align: center;"|'''-''' |
||
|- |
|- |
||
| Line 260: | Line 250: | ||
| style="text-align: center;"| 0.39% |
| style="text-align: center;"| 0.39% |
||
| style="text-align: center;"|1.15% |
| style="text-align: center;"|1.15% |
||
| − | | style="text-align: center;"|1. |
+ | | style="text-align: center;"|1.43% |
| style="text-align: center;"|'''-''' |
| style="text-align: center;"|'''-''' |
||
|- |
|- |
||
| Line 269: | Line 259: | ||
| style="text-align: center;"| - |
| style="text-align: center;"| - |
||
| style="text-align: center;"| 0.60% |
| style="text-align: center;"| 0.60% |
||
| − | | style="text-align: center;"| 0. |
+ | | style="text-align: center;"| 0.73% |
| − | | style="text-align: center;"| 1. |
+ | | style="text-align: center;"| 1.71% |
|- |
|- |
||
! scope="row" style="background-color: rgb(255, 255, 102);"|Morgana |
! scope="row" style="background-color: rgb(255, 255, 102);"|Morgana |
||
| Line 277: | Line 267: | ||
| style="text-align: center;"| - |
| style="text-align: center;"| - |
||
| style="text-align: center;"| 0.70% |
| style="text-align: center;"| 0.70% |
||
| − | | style="text-align: center;"| 0. |
+ | | style="text-align: center;"| 0.77% |
| − | | style="text-align: center;"|1. |
+ | | style="text-align: center;"|1.71% |
|- |
|- |
||
! scope="row" style="background-color: rgb(255, 255, 102);"|Mordred |
! scope="row" style="background-color: rgb(255, 255, 102);"|Mordred |
||
| Line 285: | Line 275: | ||
| style="text-align: center;"| - |
| style="text-align: center;"| - |
||
| style="text-align: center;"| 0.35% |
| style="text-align: center;"| 0.35% |
||
| − | | style="text-align: center;"| 0. |
+ | | style="text-align: center;"| 0.81% |
| − | | style="text-align: center;"|1. |
+ | | style="text-align: center;"|1.39% |
|- |
|- |
||
! scope="row" style="background-color: rgb(255, 255, 102);"|Stagkings |
! scope="row" style="background-color: rgb(255, 255, 102);"|Stagkings |
||
| Line 293: | Line 283: | ||
| style="text-align: center;"| |
| style="text-align: center;"| |
||
| style="text-align: center;"| |
| style="text-align: center;"| |
||
| − | | style="text-align: center;"| |
+ | | style="text-align: center;"|0.30% |
| − | | style="text-align: center;"| |
+ | | style="text-align: center;"|0.64% |
|- |
|- |
||
! scope="row" style="background-color: rgb(255, 255, 102);"|Pendragons |
! scope="row" style="background-color: rgb(255, 255, 102);"|Pendragons |
||
| Line 301: | Line 291: | ||
| style="text-align: center;"| |
| style="text-align: center;"| |
||
| style="text-align: center;"| |
| style="text-align: center;"| |
||
| − | | style="text-align: center;"| |
+ | | style="text-align: center;"|0.28% |
| − | | style="text-align: center;"| |
+ | | style="text-align: center;"|0.70% |
|- |
|- |
||
! scope="row" style="background-color: rgb(255, 255, 102);"|Ladys |
! scope="row" style="background-color: rgb(255, 255, 102);"|Ladys |
||
| Line 309: | Line 299: | ||
| style="text-align: center;"| |
| style="text-align: center;"| |
||
| style="text-align: center;"| |
| style="text-align: center;"| |
||
| − | | style="text-align: center;"| |
+ | | style="text-align: center;"|0.26% |
| − | | style="text-align: center;"| |
+ | | style="text-align: center;"|0.70% |
|} |
|} |
||
| + | |||
| + | ===Seal Drop Per Dark Forest=== |
||
| + | {| align="center" border="1" cellpadding="1" cellspacing="1" style="width: 500px" |
||
| + | ! scope="col" style="background-color: rgb(255,204,51)"|Seal |
||
| + | ! scope="col" style="background-color: rgb(255,204,51)"|Level 1 |
||
| + | ! scope="col" style="background-color: rgb(255,204,51)"|Level 2 |
||
| + | ! scope="col" style="background-color: rgb(255,204,51)"|Level 3 |
||
| + | ! scope="col" style="background-color: rgb(255,204,51)"|Level 4 |
||
| + | ! scope="col" style="background-color: rgb(255,204,51)"|Level 5 |
||
| + | ! scope="col" style="background-color: rgb(255,204,51)"|Level 6 |
||
| + | ! scope="col" style="background-color: rgb(255,204,51)"|Level 7 |
||
| + | ! scope="col" style="background-color: rgb(255,204,51)"|Level 8 |
||
| + | ! scope="col" style="background-color: rgb(255,204,51)"|Level 9 |
||
| + | ! scope="col" style="background-color: rgb(255,204,51)"|Level 10 |
||
| + | |- |
||
| + | | style="text-align: center; background-color: rgb(255,255,102)"|'''Merlin''' |
||
| + | | |
||
| + | | |
||
| + | | style="text-align: center"|0.29% |
||
| + | | |
||
| + | | |
||
| + | | |
||
| + | | |
||
| + | | |
||
| + | | |
||
| + | | |
||
| + | |- |
||
| + | | style="text-align: center; background-color: rgb(255,255,102)"|'''Aetherseal''' |
||
| + | | |
||
| + | | |
||
| + | | style="text-align: center"|0.04% |
||
| + | | |
||
| + | | |
||
| + | | |
||
| + | | |
||
| + | | |
||
| + | | |
||
| + | | |
||
| + | |- |
||
| + | | style="text-align: center; background-color: rgb(255,255,102)"|'''Ysbadden''' |
||
| + | | |
||
| + | | |
||
| + | | |
||
| + | | |
||
| + | | |
||
| + | | |
||
| + | | |
||
| + | | |
||
| + | | |
||
| + | | |
||
| + | |- |
||
| + | | style="text-align: center; background-color: rgb(255,255,102)"|'''Sidhe''' |
||
| + | | |
||
| + | | |
||
| + | | style="text-align: center"|0.083% |
||
| + | | |
||
| + | | |
||
| + | | |
||
| + | | |
||
| + | | |
||
| + | | |
||
| + | | |
||
| + | |} |
||
| + | |||
| + | |||
| + | |||
| + | |||
| + | ==='''The Easiest way to get a City Deed'''=== |
||
| + | |||
| + | Go to the shop and buy the relevant deed. |
||
| − | It is also possible to |
+ | It is also possible to get a deep indirectly by buying gems: a Squire's Chest from the [[Shop#Chest Items|Shop]] for 90 [[Gems]], a Knight's Chest for 150 Gems, a Lords Chest for 250 Gems, a Fey's Chest for 350 gems or an Avalon's Chest for 400 gems . There is not a 100% chance that you will get the right crests to get a new city but I've noticed if you get the Knights chest there is a reasonable chance for you to get the right amount of crests for your 4th city. |
The Squire's Chest will give you: |
The Squire's Chest will give you: |
||
| − | * 1 |
+ | * 1-3 Sir Bor's crests, and |
| − | * 1 |
+ | * 1-3 Sir Ector's crests, and |
| − | * 1 |
+ | * 1-3 Sir Kay's crests. |
The Knight's Chest will give you: |
The Knight's Chest will give you: |
||
| − | *1 |
+ | *1-3 Sir Bevidere's Crests |
| − | *1 |
+ | *1-3 Sir Gawain's Crests |
| − | *1 |
+ | *1-3 Sir Percival's Crests |
The Lord's Chest will give you: |
The Lord's Chest will give you: |
||
| − | *1 |
+ | *1-3 Sir Galahad's Crests |
| − | *1 |
+ | *1-3 Sir Lancelot's Crests |
| − | *1 |
+ | *1-3 King Arthur's Crests |
The Fey's Chest will give you: |
The Fey's Chest will give you: |
||
| − | *1 |
+ | *1-3 Morgana's Seals |
| − | *1 |
+ | *1-3 Mordred's Seals |
| − | *1 |
+ | *1-3 Stag King's Seals |
The Avalon's Chest will give you: |
The Avalon's Chest will give you: |
||
| − | *1 |
+ | *1-3 Pendragon's Seals |
| − | *1 |
+ | *1-3 Lady Of The Lake's Seals |
| − | *1 |
+ | *1-3 Merlin's Seals |
| + | |||
| + | Edit 7/24/11 by Jancy |
||
| + | |||
| + | Crests and Where I Got Them |
||
| + | |||
| + | Sir Kay |
||
| + | *Level 5 Woods |
||
| + | *Level 6 Woods |
||
| + | *Level 7 Lakes |
||
| + | *Level 8 Lakes |
||
| + | Sir Bor |
||
| + | *Level 5 Mountains |
||
| + | *Level 6 Mountains |
||
| + | *Level 7 Woods |
||
| + | *Level 8 Woods |
||
| + | Sir Ector |
||
| + | *Level 5 Mountains |
||
| + | *Level 6 Mountains |
||
| + | *Level 6 Grasslands |
||
| + | *Level 7Woods |
||
| + | *Level 8 Woods |
||
| + | *Level 7 Lakes |
||
| + | *Level 8 Lakes |
||
| + | Sir Bedivere |
||
| + | *Level 6 Mountain |
||
| + | *Level 7 Woods |
||
| + | *Level 8 Woods |
||
| + | *Level 7 Lakes |
||
| + | *Level 8 Lakes |
||
| + | *Level 8 Mountain |
||
| + | Sir Gawain |
||
| + | *Level 6 Hills |
||
| + | *Level 7 Hills |
||
| + | *Level 7 Woods |
||
| + | *Level 8 Woods |
||
| + | *Level 7 Lakes |
||
| + | *Level 8 Lakes |
||
| + | Sir Galahad |
||
| + | *Level 7 Woods |
||
| + | *Level 7 Lakes |
||
| + | *Level 8 Plain |
||
| + | Sir Percival |
||
| + | *Level 7 Woods |
||
| + | *Level 7 Lakes |
||
| + | *Level 8 Woods |
||
| + | *Level 8 Lakes |
||
| + | *Level 8 Mountain |
||
| + | Sir Lancelot |
||
| + | *Level 7 Woods |
||
| + | *Level 7 Lakes |
||
| + | Arthur's Seal |
||
| + | *Level 8 Woods |
||
| + | *Level 8 Lakes |
||
| + | *Level 8 Grassland |
||
| + | Mordred's Seal |
||
| + | *Level 8 Woods |
||
| + | *Level 8 Lakes |
||
| + | Morgana's Seal |
||
| + | *Level 8 Woods |
||
| + | *Level 8 Lakes |
||
| + | Stag King's Seal |
||
| + | *Level 8 Woods |
||
| + | *Level 8 Lakes |
||
| + | Pendragon |
||
| + | *Level 9 Grassland |
||
| + | Lady of the Lake's Seal |
||
| + | *Level 8 Woods |
||
| + | *Level 8 Lakes |
||
==Loyalty== |
==Loyalty== |
||
| + | You can spend unused crest on your knights to get higher [[loyalty]] from them. In Knight Hall there is a button called "Reward". Click that button and choose "Crests". In the next picture you can choose which crest you want to use on that knight. Of course, since the loyalty has not come to any use yet, spending your crest on your knights' loyalty may not be a good idea, some crests are useful for crafting, whereas gold can be used and is great surplus in the game. Also, although not yet fully confirmed, it has been observed that increasing a knight's loyalty early on in the knight's skill development is the best time to use your surplus crests. Higher loyalty appears to increase EXP gain rate. ''edit: Developers stated in the forums that loyalty does absolutely nothing in the game. It will not increase experience gain rate.''{{dubious}} |
||
| − | You can spend unused crest on your knights to get higher |
||
| − | [[loyalty]] from them. In Knight Hall there is a button called "Reward". Click that button and choose "Crests". In the next picture you can choose which crest you want to use on that knight. Of course, since the loyalty has not come to any use yet, spending your crest on your knights' loyalty is a waste. However, once you increase their loyalty, it will not drop back to the amount of loyalty before. |
||
==Statistics== |
==Statistics== |
||
| Line 357: | Line 484: | ||
Note that these results are based entirely on level-7 wilderness farming. How the odds change for different levels of wildernesses is not known. |
Note that these results are based entirely on level-7 wilderness farming. How the odds change for different levels of wildernesses is not known. |
||
| − | As of the November 22nd update King Arthur's Crests , Morgana's Seals and Mordred's Seals are now dropping in level 8-10 wilds |
+ | As of the November 22nd update King Arthur's Crests , Morgana's Seals and Mordred's Seals are now dropping in level 8-10 wilds. |
| + | |||
| + | As of March 2011 update Stag King Seal's, Pendragon Seal's and Lady Of The Lake Seal's are now dropping in level 8 -10 wilds. |
||
| + | |||
| + | =='''Animal Hides etc. by Lord Muttly''' ed by Bytebasher== |
||
| + | |||
| + | Animal Hides and Pristine Yew Branches are found in woods and dark forests of levels from 6 to 10. The chance of them dropping in Level 1-5 wilds seems to be very low, if at all. (update by Bytebasher ed.) |
||
| + | |||
| + | ==References== |
||
| + | <references/> |
||
[[Category:Crests]] |
[[Category:Crests]] |
||
[[Category:Shop]] |
[[Category:Shop]] |
||
[[Category:Cities]] |
[[Category:Cities]] |
||
| − | [[Category:Crests]] |
||
[[Category:Battle]] |
[[Category:Battle]] |
||
[[Category:Game Research]] |
[[Category:Game Research]] |
||
Latest revision as of 15:46, 7 March 2014
Crests are randomly found from a level 5-10 wilderness after a victorious attack. They can also be purchased from the shop and be obtained from chests.
A certain combination of crests reward you with the third, fourth, fifth, sixth, seventh, and eighth city deeds. The Seals were introduced to the game starting with the sixth city deed.
Crests can also be used to increase a knights loyalty
Types of Crest/Seal
- ==Only certain types of crests are dropped in each level wild:==
| Crest | Name | Properties | Level of Wilderness |
|---|---|---|---|

|
Sir Bor's Crest | Increases Knights loyalty by 5% | 5-7 |

|
Sir Ector's Crest | Increases Knights loyalty by 10% | 5-7 |

|
Sir Kay's Crest | Increases Knights loyalty by 15% | 5-8 |

|
Sir Bedivere's Crest | Increases Knights loyalty by 20% | 6-8 |

|
Sir Gawain's Crest | Increases Knights loyalty by 25% | 6-8 |

|
Sir Percival's Crest | Increases Knights loyalty by 30% | 7-9 |

|
Sir Galahad's Crest | Increases Knights loyalty by 40% | 7-9 |

|
Sir Lancelot's Crest | Increases Knights loyalty by 50% | 7-9 |

|
King Arthur's Crest | Increases Knights loyalty by 60% | 8+ |

|
Morgana's Seal | N/A | 8+ |

|
Mordred's Seal | N/A |
8+ |

|
Stag King's Seal | N/A | 8+ |

|
Pendragon Seal | N/A | 8+ |

|
Lady Of The Lake´s Seal | N/A | 8+ |

|
Merlin´s Seal | N/A | 1+ |

|
Aetherseal | N/A | |
|
|
Ysbadden Seal | N/A | |
|
|
Sidhe Seal | N/A | 2+ DF |


Where to find them
Crests are obtained (Dropped) when your attack on an unowned Wilderness of level 5 or greater is successful. See Tournament of Crests strategy section for advice on collecting crests from wilds. When you win a crest, it will be listed in the battle report in the Resources Won area. Or, you can check under my items to see how many crests you currently have. The table in the section above includes a column for which level wildernesses each can be found. Crests drop on any successful attack, whether you "conquer" the wilderness or not. Cresting is normally done as repeated attacks on a wild at short range from a city that has all of its wild slots occupied. That wild is never captured so it can be attacked immediately for another crest, before the troops re-build, so that only a very small number of troops need to be assigned.
Attacking a wild owned by another player does not give any dropped items. (i think, Bytebasher ed.)
These are the chances of drop calculated on the Crest_Drop_Research page, per attack, as per 25/09/2010
The Old Way
It was originallly thought that one had to perform a capture-abandon cycle on a wilderness to obtain crests, seals or other drop items. This may have been true early one, but as of early 2013 (when I started cresting) it was no longer needed.
The Easy Way
You can attack the same wild repeatedly getting crests at a rate between 4 and 20% from each attack. Assign 5000 Calvary to repeatedly attack any level 7-9 wild at short range and you will reap crests, seals, Lancelot's Training tokens, Throne Room and Champion cards in good numbers. Attacking Woods has the added possibility of dropping Pristine Yew Branches, needed to build Flame Archers.
Wilds Do Not Have to Have Defenses In Order To Win Crests
Wilds give the same chance to drop items each time you attack, even when those attacks come only seconds apart. There do not have to be troops regenerated and there is no waiting time to "re-stock" the wilderness with items.
You cannot attack an ally's wilds
Someone wondered about what would drop if you attacked an ally's wild, but as the game does not allow you to do that, so the question is moot.
Ron's Report
I have done 115 repeated attacks on a level 9 wild with 1000 archers over a 27 minute period and got no crests/seals. This means that the probability of getting a crest/seal is less than 2.57% (95% confidence). The expected frequency of getting a crest/seal in a level 9 wild is 6.15%, so even if an unregenerated wild occasionally produces a crest, it happens a lot less than the frequency in regenerated or partially regenerated wilds.
Edit 1 April 2011 by Ron Lacey
Here is a list of Crests and where I found them based on 200 attacks. The best result was Level 7 woods for 5th city crests.
Actual crests locations and number found:
Sir Kay
Lvl 5 Woods - 3
Lvl 6 Lake - 2
Lvl 7 Mtn - 3
Lvl 7 woods - 2
Sir Bor
Lvl 5 Woods - 5
Lvl 6 lake - 4
Lvl 7 Woods - 6
Sir Ector
Lvl 5 Woods - 3
Lvl 6 Plain - 2
Lvl 6 Lake - 1
Lvl 7 Woods - 1
Plain & Mtn - 1 each
Sir Bedivere
Lvl 6 Lake - 1
Lvl 6 Grass - 1
Lvl 7 Wood - 1
Lvl 8 Mtn - 1
Sir Galahad
Lvl 7 Wood - 3
Sir Gawain's
Lvl 7 Wood - 6
Lvl 8 Lake - 1
Sir Percival
Lvl 7 Wood - 3
Sir Lancelot
Lvl 7 Wood - 3
Lvl 8 Wood - 1
The Hard but Second fastest Fast Way by Xeger And corrected by Ian Moffett:
For you die hards who have been getting aggravated by crest farming, I got ya covered. The easiest way to get your 3rd and 4th city deed, is to select a type of wild, and attack that same type relentlessly. Don't stop until you win a crest. Send out three or four waves consisting of your suicide squad, and your main force. Once you have obtained a crest, wait for the rest to get back in, then attack a new type of wild. But don't be suprised if you attacked six times and did not get one, I can assure you that you will. And, if you time it right, a minute or less between your main attack forces, you could score twice, So get those fingers ready, and that mouse set. To acheive any of this you need to be quick, not super-fast. Just quick.
My best yet is 2 Bevidere's and 1 Kay, the attacks was a set of 4: 2 suicide squads, and two set's of archers, these groups going to two lvl 7 mountains, and two lvl 7 forest. So in this I scored 2/2 in the mountains, and 1/2 with the forest. My gains for crest farming is about 45% using this method.
Remember, Once you get a crest, move on. Also, when it comes to lakes and grasslands, treat them as seperate wilds, grasslands are better for farming than lakes. Happy cresting.   There is currently no research or evidence showing any certain type of wild has a greater likelyhood of a crest drop than any other type of wild. However, thereis research and data showing attacking a higher level wild has a greater chance of obtaining a crest as the chart below shows.
NOTE: Data for the new level system is in early stages! All percentages were last updated on 9 February 2011.
| Crest | Level 5 | Level 6 | Level 7 | Level 8 | Level 9 | Level 10 |
|---|---|---|---|---|---|---|
| Bor | 5.04% | 9.20% | 5.21% | - | - | - |
| Ector | 3.24% | 5.75% | 4.31% | - | - | - |
| Kay | 2.88% | 1.72% | 3.79% | 4.08% | - | - |
| Bedivere | - | 1.44% | 2.25% | 3.15% | - | - |
| Gawain | - | 2.59% | 2.70% | 4.44% | - | - |
| Percival | - | - | 1.13% | 1.61% | 1.77% | - |
| Galahad | - | - | 0.45% | 1.45% | 1.13% | - |
| Lancelot | - | - | 0.39% | 1.15% | 1.43% | - |
|
Arthur |
- | - | - | 0.60% | 0.73% | 1.71% |
| Morgana | - | - | - | 0.70% | 0.77% | 1.71% |
| Mordred | - | - | - | 0.35% | 0.81% | 1.39% |
| Stagkings | 0.30% | 0.64% | ||||
| Pendragons | 0.28% | 0.70% | ||||
| Ladys | 0.26% | 0.70% |
Seal Drop Per Dark Forest
| Seal | Level 1 | Level 2 | Level 3 | Level 4 | Level 5 | Level 6 | Level 7 | Level 8 | Level 9 | Level 10 |
|---|---|---|---|---|---|---|---|---|---|---|
| Merlin | 0.29% | |||||||||
| Aetherseal | 0.04% | |||||||||
| Ysbadden | ||||||||||
| Sidhe | 0.083% |
The Easiest way to get a City Deed
Go to the shop and buy the relevant deed.
It is also possible to get a deep indirectly by buying gems: a Squire's Chest from the Shop for 90 Gems, a Knight's Chest for 150 Gems, a Lords Chest for 250 Gems, a Fey's Chest for 350 gems or an Avalon's Chest for 400 gems . There is not a 100% chance that you will get the right crests to get a new city but I've noticed if you get the Knights chest there is a reasonable chance for you to get the right amount of crests for your 4th city.
The Squire's Chest will give you:
- 1-3 Sir Bor's crests, and
- 1-3 Sir Ector's crests, and
- 1-3 Sir Kay's crests.
The Knight's Chest will give you:
- 1-3 Sir Bevidere's Crests
- 1-3 Sir Gawain's Crests
- 1-3 Sir Percival's Crests
The Lord's Chest will give you:
- 1-3 Sir Galahad's Crests
- 1-3 Sir Lancelot's Crests
- 1-3 King Arthur's Crests
The Fey's Chest will give you:
- 1-3 Morgana's Seals
- 1-3 Mordred's Seals
- 1-3 Stag King's Seals
The Avalon's Chest will give you:
- 1-3 Pendragon's Seals
- 1-3 Lady Of The Lake's Seals
- 1-3 Merlin's Seals
Edit 7/24/11 by Jancy
Crests and Where I Got Them
Sir Kay
- Level 5 Woods
- Level 6 Woods
- Level 7 Lakes
- Level 8 Lakes
Sir Bor
- Level 5 Mountains
- Level 6 Mountains
- Level 7 Woods
- Level 8 Woods
Sir Ector
- Level 5 Mountains
- Level 6 Mountains
- Level 6 Grasslands
- Level 7Woods
- Level 8 Woods
- Level 7 Lakes
- Level 8 Lakes
Sir Bedivere
- Level 6 Mountain
- Level 7 Woods
- Level 8 Woods
- Level 7 Lakes
- Level 8 Lakes
- Level 8 Mountain
Sir Gawain
- Level 6 Hills
- Level 7 Hills
- Level 7 Woods
- Level 8 Woods
- Level 7 Lakes
- Level 8 Lakes
Sir Galahad
- Level 7 Woods
- Level 7 Lakes
- Level 8 Plain
Sir Percival
- Level 7 Woods
- Level 7 Lakes
- Level 8 Woods
- Level 8 Lakes
- Level 8 Mountain
Sir Lancelot
- Level 7 Woods
- Level 7 Lakes
Arthur's Seal
- Level 8 Woods
- Level 8 Lakes
- Level 8 Grassland
Mordred's Seal
- Level 8 Woods
- Level 8 Lakes
Morgana's Seal
- Level 8 Woods
- Level 8 Lakes
Stag King's Seal
- Level 8 Woods
- Level 8 Lakes
Pendragon
- Level 9 Grassland
Lady of the Lake's Seal
- Level 8 Woods
- Level 8 Lakes
Loyalty
You can spend unused crest on your knights to get higher loyalty from them. In Knight Hall there is a button called "Reward". Click that button and choose "Crests". In the next picture you can choose which crest you want to use on that knight. Of course, since the loyalty has not come to any use yet, spending your crest on your knights' loyalty may not be a good idea, some crests are useful for crafting, whereas gold can be used and is great surplus in the game. Also, although not yet fully confirmed, it has been observed that increasing a knight's loyalty early on in the knight's skill development is the best time to use your surplus crests. Higher loyalty appears to increase EXP gain rate. edit: Developers stated in the forums that loyalty does absolutely nothing in the game. It will not increase experience gain rate.[dubious ]
Statistics
For Research on Crest Drop: Crest Drop Research
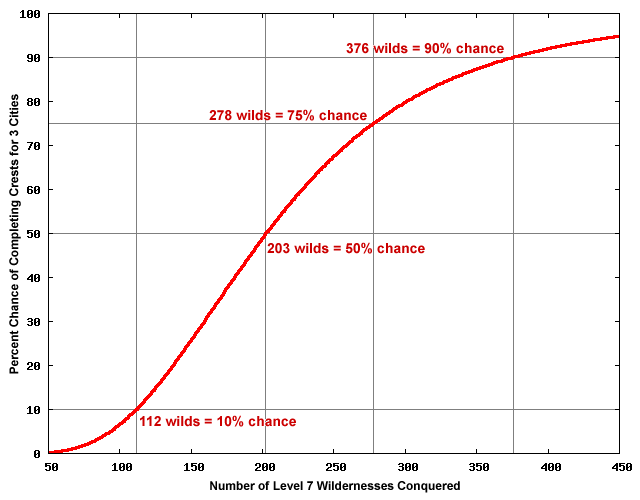
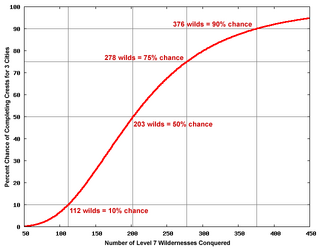
Based on record keeping from the Tournament of Crests and collecting crests for a third city. I think these are reasonable assumptions:
- Odds of dropping any crest from a level 7 wilderness = 1/20
- Bor's crest is twice as likely to drop as Ector's crest
- Ector's crest is twice as likely to drop as Kay's crest
- Therefore, when a crest drops: 4/7 will be Bor's, 2/7 will be Ector's, and 1/7 will be Kay's.
To get the Third City Deed, you need to collect 4 Bor's, 2 Ector's and 1 Kay's crest. We can calculate the odds of finding at least that many crests in a given number of level 7 wildernesses with a little programming. The results are shown in this graph (click it to view full size).
On average, players will need to farm about 200 level-7 wilderness tiles to collect the crests needed to build a third city. As the graph shows, it will take almost twice that for 10% of the players. That is a lot of farming, and a lot of troops lost to the 150 traps on each of those tiles. Collecting crests is neither quick nor easy.
Note that these results are based entirely on level-7 wilderness farming. How the odds change for different levels of wildernesses is not known.
As of the November 22nd update King Arthur's Crests , Morgana's Seals and Mordred's Seals are now dropping in level 8-10 wilds.
As of March 2011 update Stag King Seal's, Pendragon Seal's and Lady Of The Lake Seal's are now dropping in level 8 -10 wilds.
Animal Hides etc. by Lord Muttly ed by Bytebasher
Animal Hides and Pristine Yew Branches are found in woods and dark forests of levels from 6 to 10. The chance of them dropping in Level 1-5 wilds seems to be very low, if at all. (update by Bytebasher ed.)